OSGi in a Nutshell: Launch a simple Service
This week we are finally ready to start working on our first use case: how to create and launch a simple service component in OSGi.
We will proceed as follows: we first describe how this can be done in a pure Java environment, and then we will move to OSGi. For our examples we are going to use Eclipse IDE, since it already offers the possibility to run your application both in plain Java and within the OSGi framework. Let’s start!
Use Case
Our use case is simple: we want to construct an application which provides a service interface, an implementation for it, and a consumer which uses the service.
Pure Java
To build such an application in pure Java we would start with creating a Java Project in Eclipse, which will constitute our first module (we are working in Java 11, so we are taking advantage of the Java Platform Module System). In this first module we are going to create two packages, one with the service interface and one with the implementation.
The project should look something like:
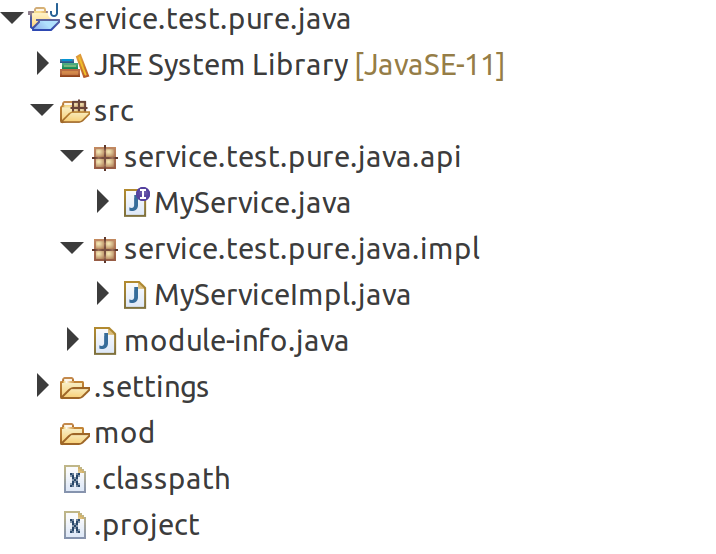
where MyService is our service interface and MyServiceImpl is the implementation.
package service.test.pure.java.api;

public interface MyService {
    public String getMessage();
}
package service.test.pure.java.impl;

import service.test.pure.java.api.MyService;

public class MyServiceImpl implements MyService {

    @Override
    public String getMessage() {
        return "Hi Ilenia";
    }
}
In the module-info.java file we are going to specify the package that we want to be available from the outside, which, in our case, is the one containing the service interface. In addition to that we need to specify that we are providing in this module an implementation for MyService, through MyServiceImpl.
module service.test.pure.java {
    exports service.test.pure.java.api;
    provides service.test.pure.java.api.MyService with service.test.pure.java.impl.MyServiceImpl;
}
After that we need to package our module in a .jar file, which can then be included in the module path for our consumer module.
Then we need a consumer for our service, and we are going to define that in another module. So, we can generate a second Java Project in Eclipse, with a package containing our service consumer. Before using the service, we need to look for it, so we will make use of the java.util.ServiceLoader class.
The project should look something like:
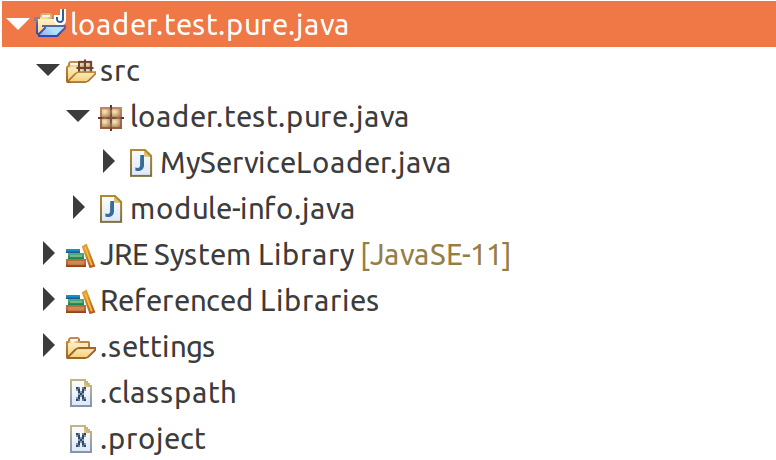
where our MyServiceLoader is:
package loader.test.pure.java;

import java.util.*;
import service.test.pure.java.api.*;

public class MyServiceLoader {
    public static void main(String[] args) {
        ServiceLoader<MyService> loader = ServiceLoader.load(MyService.class);
        for(MyService service : loader) {
            System.out.println(service.getMessage());
        }
    }
}
and the module-info.java file looks like:
module loader.test.pure.java {
    requires service.test.pure.java;
    uses service.test.pure.java.api.MyService;
}
where we are requiring the module with the service interface, and we are saying that we want to look up for MyService through the ServiceLoader.
We are now ready to launch our application like a standard Java Application. In the IDE, you can simply right click on MyServiceLoader and select Run->Java Application.
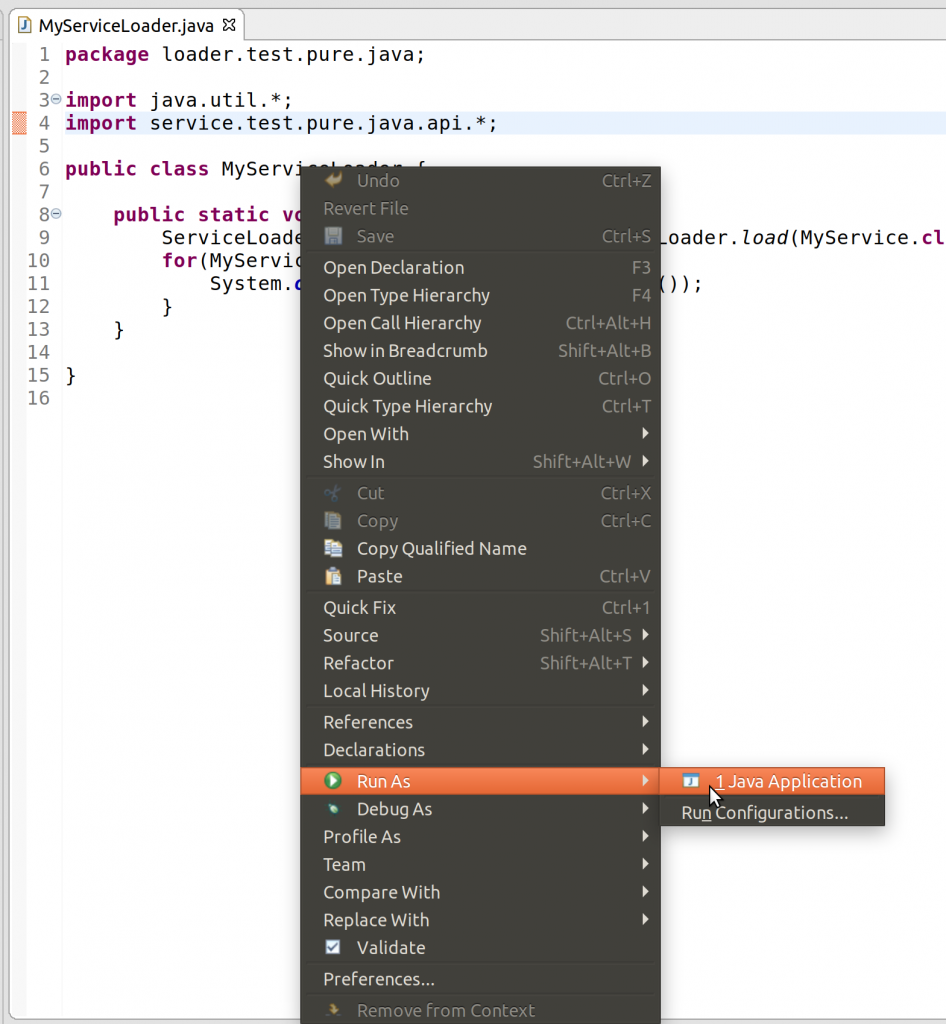
In the console you should see the message (in this case "Hi Ilenia") printed.
In Pure OSGi
Now, let’s see how the same thing can be achieved in OSGi.
We will actually look at two cases here. The first one using only OSGi in the Eclipse PDE, and the second one using OSGi and Bndtools. We want to show both the approaches, but, please not that the first one is outdated now, and it is very recommended to make use of bnd when in an OSGi framework, because it makes things a lot easier!
That said, let’s start with the PDE case.
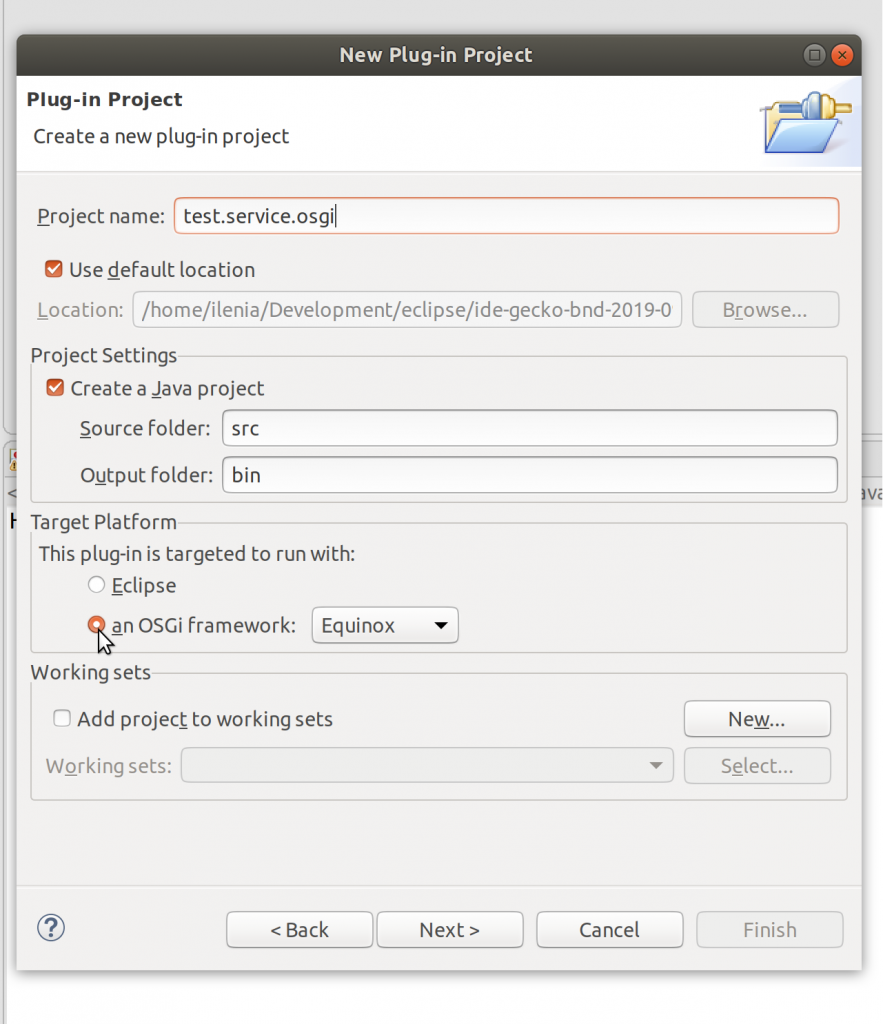
We still are going to create two separate modules, which in the OSGi world are called bundles, one for the service interface and its implementation, and one for the service consumer. We can still use the IDE to help us set up the projects, but this time, instead of generating two Java Project, we will use the Plug-in Project.
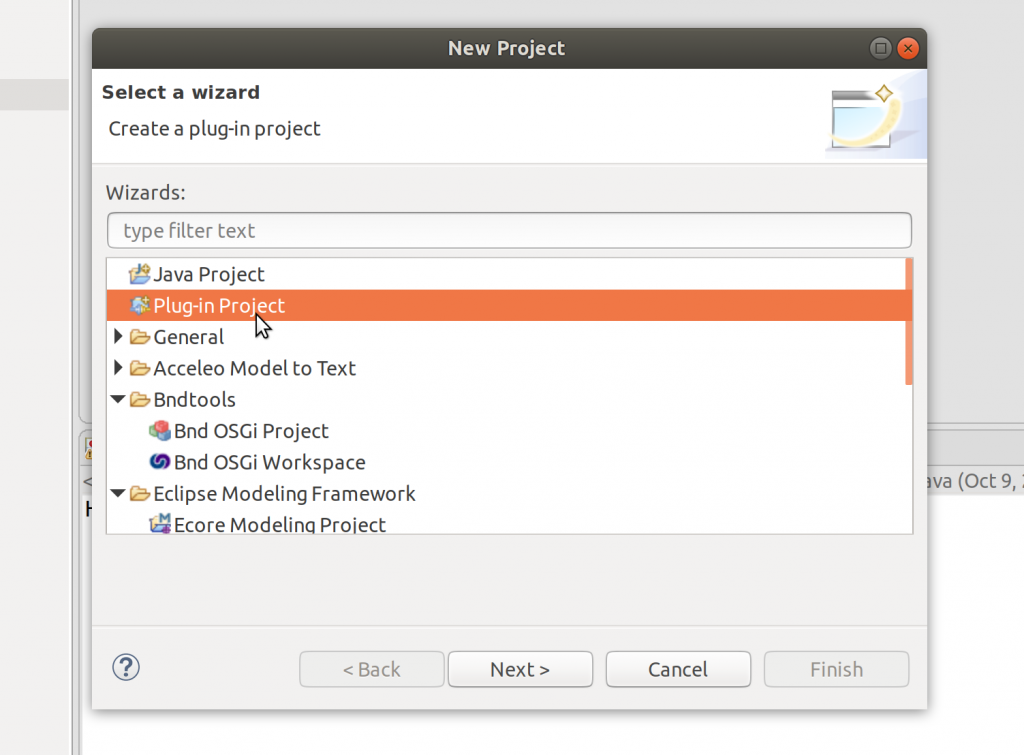
In the next dialog select the OSGi framework:
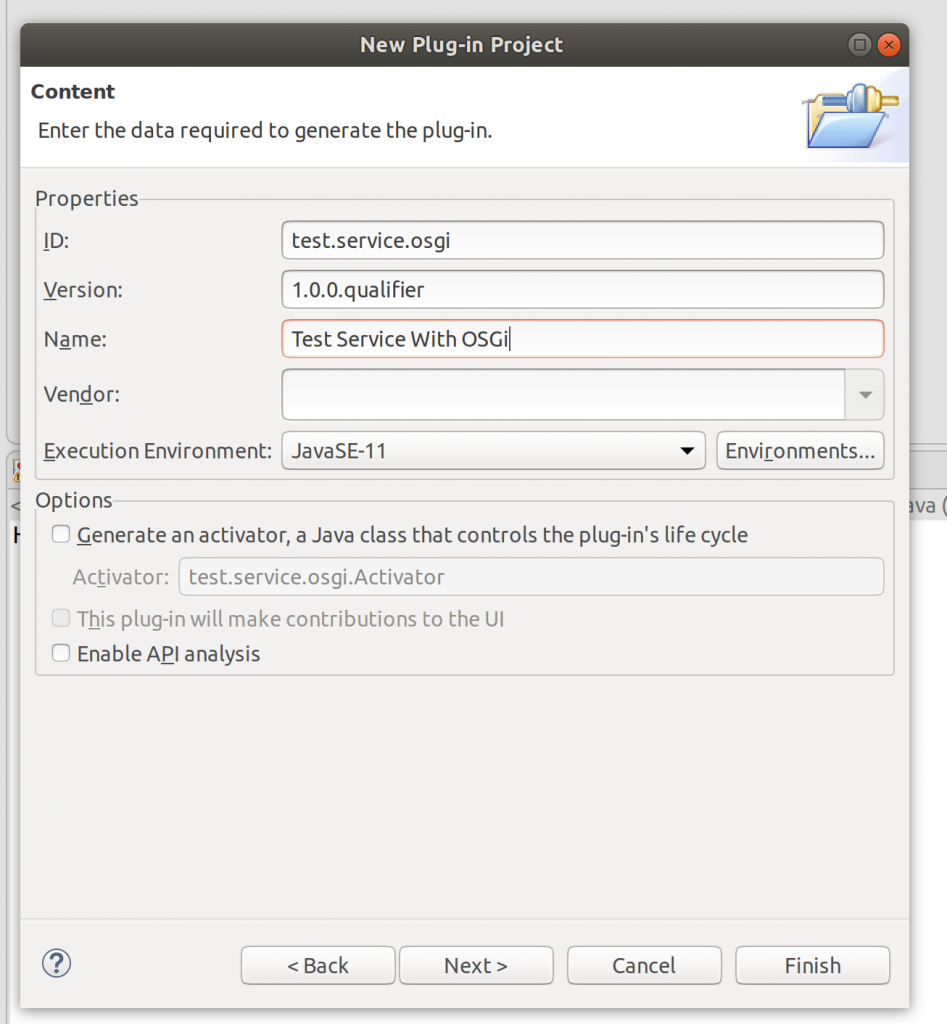
In the next dialog, you are asked to insert some meta information about the bundle, which will be used to fill the MANIFEST.MF file, which, as we discussed in the introduction to this blog series, can be seen as the equivalent of the module-info.java file.
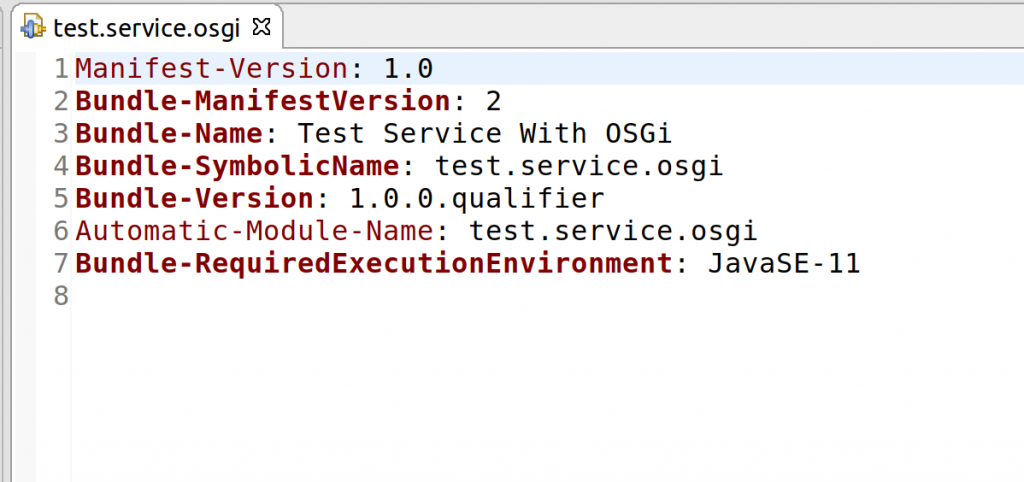
And that’s it! Once generated, the editor should automatically open for you the MANIFEST.MF file, which looks like:
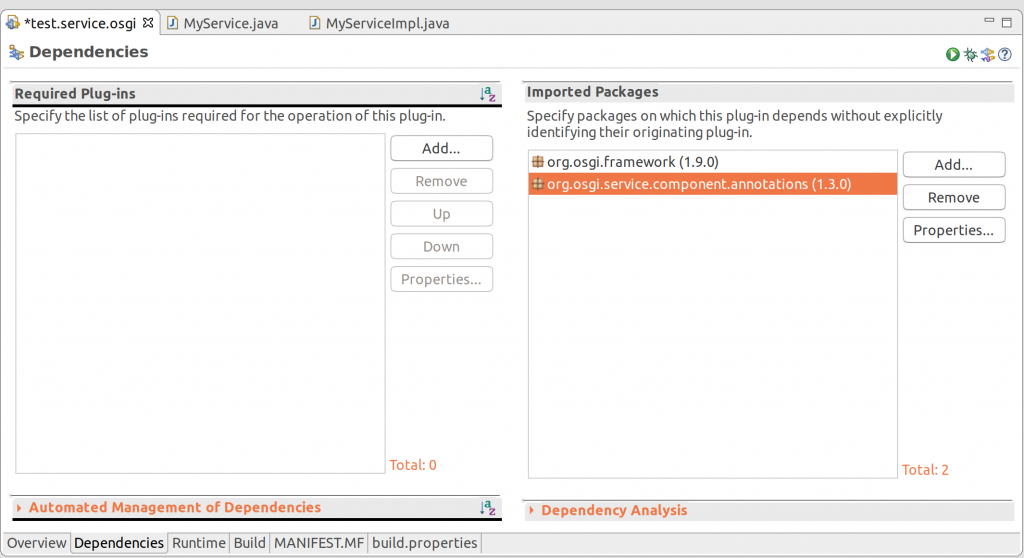
For the scope of our tutorial, we would need to add two dependencies here, so, you should go to the dependencies tab and add the org.osgi.framework and org.osgi.service.component.annotations packages.
Also in this case we created two packages, one for the interface and one for the implementation. The service interface looks exactly the same as in our Pure Java example, while the implementation looks like this:
package test.service.osgi.impl;

import org.osgi.service.component.annotations.Activate;
import org.osgi.service.component.annotations.Component;

import test.service.osgi.api.MyService;

@Component(immediate = true, service = MyService.class)
public class MyServiceImpl implements MyService {

    @Activate
    public void activate() {
        System.out.println("MyService is active!");
    }

    @Override
    public String getMessage() {
        return "Hi Ilenia";
    }
}
Let’s focus on the differences with respect to what we saw earlier.
- We are using the
org.osgi.service.component.annotations.Componentannotation, to mark ourMyServiceImplas a service. This annotation takes a lot of optional elements, but here we are just setting two of them,immediate, which specifies, in this case, that the component should be activated as soon as the bundle is activated, andservice, which specifies the service interface for which we are providing an implementation. - We are using another annotation,
org.osgi.service.component.annotations.Activate, to mark a method. This is used to tell the OSGi framework whether we want the component to do something at the activation. In our case, we want just to print a message to ensure us that the service is active.
We are almost done. We just need to add in the project an additional folder, called OSGI-INF with the xml description of our component, test.service.osgi.impl.MyServiceImpl.xml
<?xml version="1.0" encoding="UTF-8"?>
<scr:component xmlns:scr="http://www.osgi.org/xmlns/scr/v1.4.0" name="test.service.osgi.api.MyService"
immediate="true" activate="activate">
  <service scope="singleton">
  <provide interface="test.service.osgi.api.MyService"/>
  </service>
  <implementation class="test.service.osgi.impl.MyServiceImpl"/>
</scr:component>
where we are specifying the name of the service interface and of its implementation, as well as some properties, like the fact that our component is marked as immediate and with a method called activate which needs to be executed at activation. Do not worry for now about the service scope, we will treat it in a more advanced tutorial.
Now that we also have this ingredient, we just need to add a few lines into our MANIFEST.MF and we are ready to proceed with the consumer.

Compared to what was automatically generated and added after we inserted the dependencies, we need to specify which package we want to export (Export-Package), where to find our service description (Service-Component), and the bundle activation policy (we will come back at a later step also on this one).
OK, so far so good. Now we need to create a second bundle for our service consumer. Just follow the same step we did here, and add in the project a package with a component for the consumer, which could look something like:
package test.osgi.service.consumer;

import org.osgi.service.component.annotations.Activate;
import org.osgi.service.component.annotations.Component;
import org.osgi.service.component.annotations.Reference;

import test.service.osgi.api.MyService;

@Component(immediate = true, service = MyConsumer.class)
public class MyConsumer {

    @Reference
    MyService myService;

    @Activate
    public void activate() {
        printMessage();
    }

    public void printMessage() {
        if(myService != null) {
            System.out.println(myService.getMessage());
        }
        else {
            System.out.println("MyService ref is null!!");
        }
    }
}
The only new thing here is, again, an annotation: org.osgi.service.component.annotations.Reference. This is used to tell the OSGi framework that we want an instance of MyService to be injected here. Through this annotation, under the hood, the OSGi framework is doing something similar to what the ServiceLoader was doing in the Plain Java case, namely looking for an implementation of MyService and giving it to you.
The MANIFEST.MF for the consumer looks like:

which reflects the dependencies

where we required, in addition to what previously seen the console, and the package containing the service interface.
We are now ready for running our application. You can set up a run configuration in the IDE, by clicking the Run->Run Configurations… menu, and select OSGi Framework. Then, in the list of bundles, look for your service and consumer bundles, and then click on Add Required Bundles.
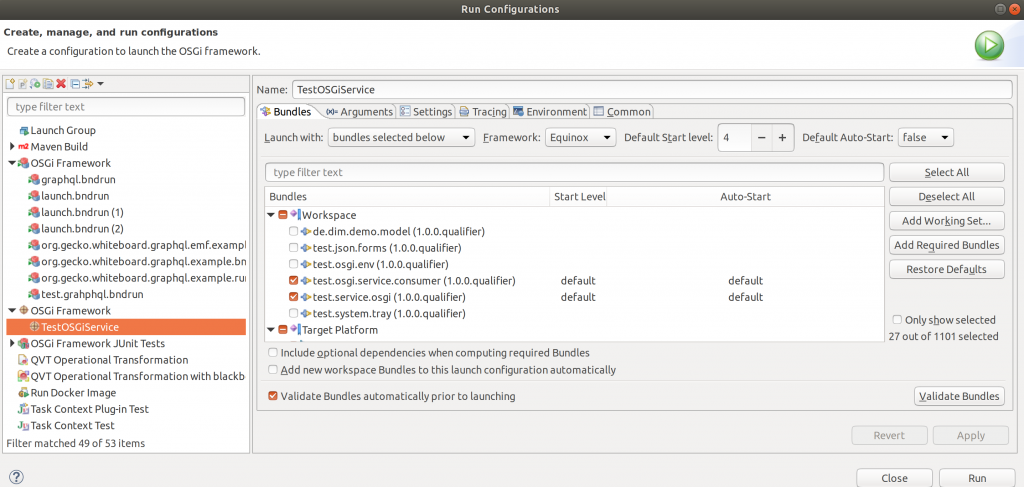
Apply and then run the application. You should get first the message "MyService is active!" and then "Hi Ilenia" printed on the console.
Discussion
Well, if we just look at what we had to write and set up, it does not seem that OSGi is very convenient for this use case. So, what are the advantages here?
Well, remember when we discussed about the fact that OSGi is dynamic? Well, we can start to see some of that dynamism at work. Let’s add, in both our MyServiceImpl and MyConsumer components, an additional method deactivate marked with the org.osgi.service.component.annotations.Deactivate annotation. As the name suggests, this tells the OSGi framework to execute that method, just before deactivating the component. A component is deactivated, for instance, when its bundle is stopped, and so no longer available.
package test.service.osgi.impl;

import org.osgi.service.component.annotations.Activate;
import org.osgi.service.component.annotations.Component;
import org.osgi.service.component.annotations.Deactivate;

import test.service.osgi.api.MyService;

@Component(immediate = true, service = MyService.class)
public class MyServiceImpl implements MyService {

    //MISSING CODE WITH ALREADY SEEN PARTS...

    @Deactivate
    public void deactivate() {
        System.out.println("MyService is not longer available");
    }
}
package test.osgi.service.consumer;

import org.osgi.service.component.annotations.Activate;
import org.osgi.service.component.annotations.Component;
import org.osgi.service.component.annotations.Deactivate;
import org.osgi.service.component.annotations.Reference;

import test.service.osgi.api.MyService;

@Component(immediate= true, service = MyConsumer.class)
public class MyConsumer {

    //MISSING CODE WITH ALREADY SEEN PARTS...

    @Deactivate
    public void deactivate() {
        System.out.println("MyConsumer is not longer available");
    }
}
Now, launch again your application, and first let’s check out which are the ids of our bundles. You can do that by typing ss in the console:
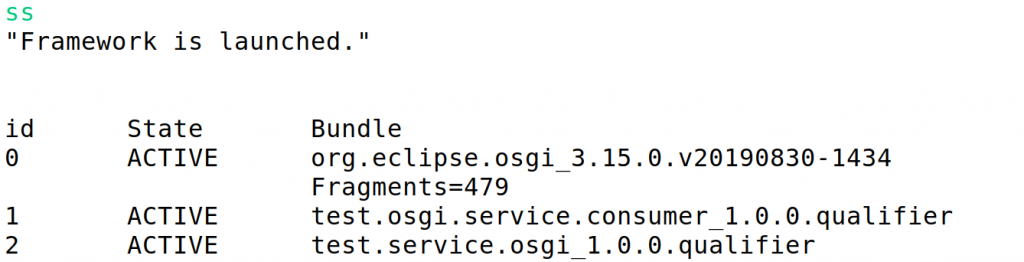
Our two bundles have id 1 (the consumer) and 2 (the service). You can also see that both of them are active. Now, let’s stop the bundle of MyService, by simply typing stop followed by the bundle id.
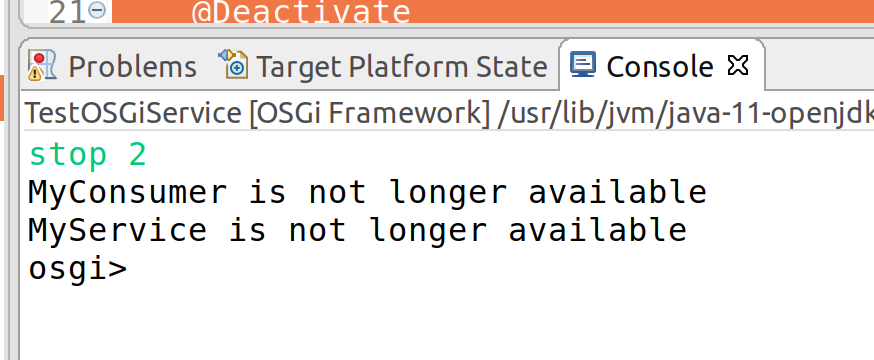
As you can see both the components have been deactivated! Indeed MyConsumer needed a reference to MyService to be able to work properly, and since MyService is no longer available because we stopped its bundle, then also MyConsumer has been deactivated by the OSGi framework!
What happens if we restart the bundle 2?
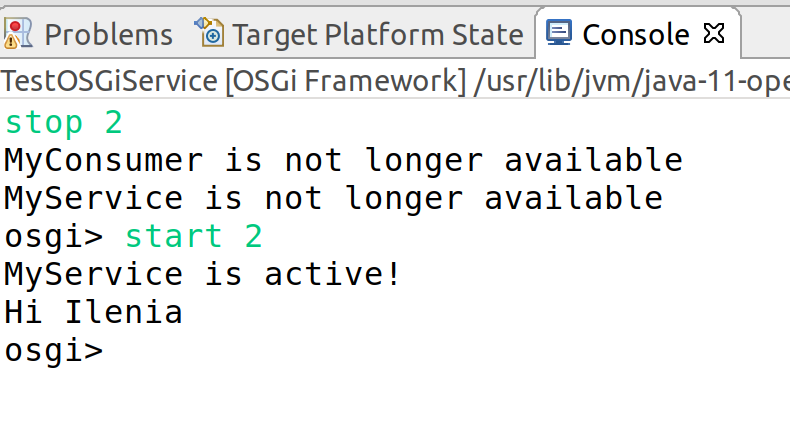
As expected, both the activation actions in MyServiceImpl and MyConsumer are called, printing the two messages!
Notice that we did all this, without the need to stop the whole application and restart it, but by simply manipulating the lifecycle of the bundles while the application is running!
Some help from bnd
Despite the fact that you can dynamically handle your bundles, I cannot deny that the setup we just shown with pure OSGi and the PDE requires a lot of work from the developer. And the more things you need to do, the easier it is to forget something and get stuck!
Luckily for us, we do not need anymore to do all that work just to write a simple service and its consumer. There are very efficient tools which do the dirty work for us, making a lot easy working with OSGi!
bndtools is one of them! In this series of posts we will use bnd to help us generating and managing our OSGi projects. At Data In Motion GmbH, we have also developed some useful project templates based on `org.bndtools.templates.osgi’. You can benefit from them as well, by adding to your dependencies:
<dependency>
  <groupId>org.gecko.runtime</groupId>
  <artifactId>org.gecko.templates</artifactId>
  <version>1.0.31</version>
</dependency>
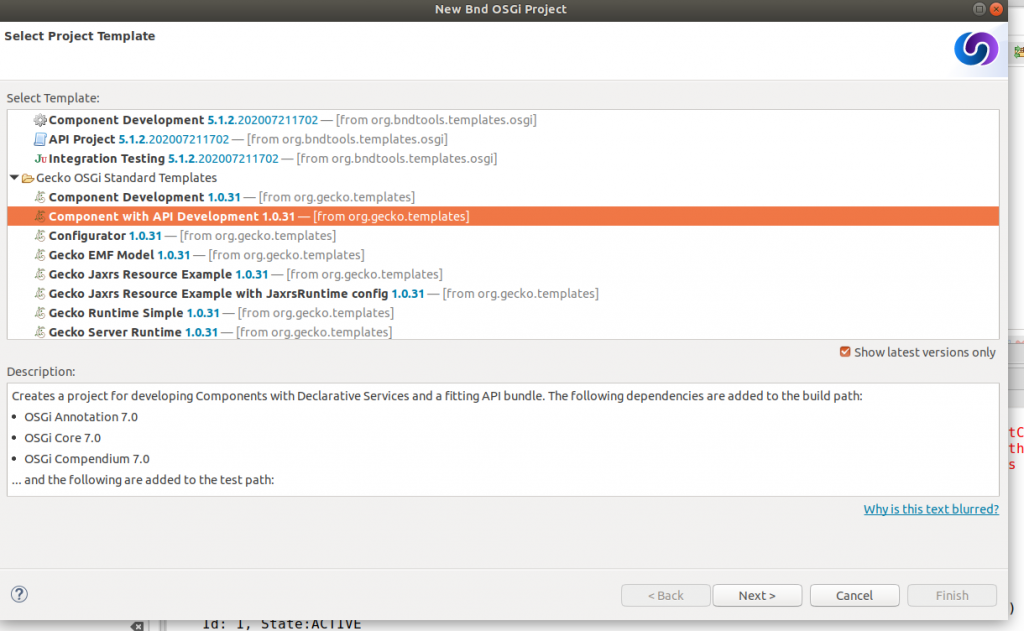
For today use case we will use two of such templates. The first one is the one which allows us to easily generate an OSGi bnd project for a service interface and its implementation. In the Package Explorer view of Eclipse, if you have included the mentioned dependency, you can simply right click and select New->Bnd OSGi Project->Component with API Development, from the list Gecko OSGi Standard Templates.
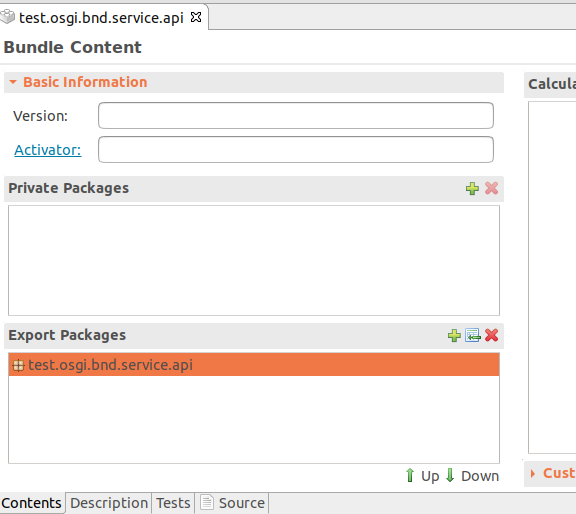
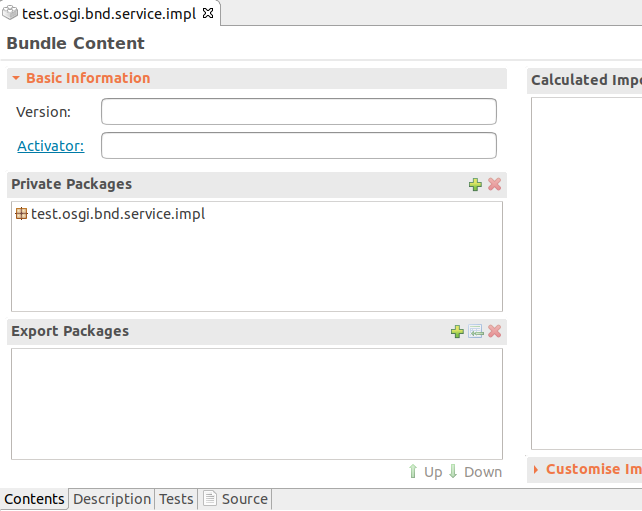
The generated project should contain two packages, one for the interface and one for the implementation, together with a sample code for both of them. A test folder, together with the junit dependencies is also generated, so you can directly test your code. Two .bnd files, (api.bnd and impl.bnd) are also created. These are used to set the directives of the exported and private packages, respectively. So, you can add the api package in the exported list of the api.bnd and the implementation package in the list of private packages in impl.bnd.
The code is automatically build every time you change something, and you can immediately see the generated .jar files, in the generated folder.
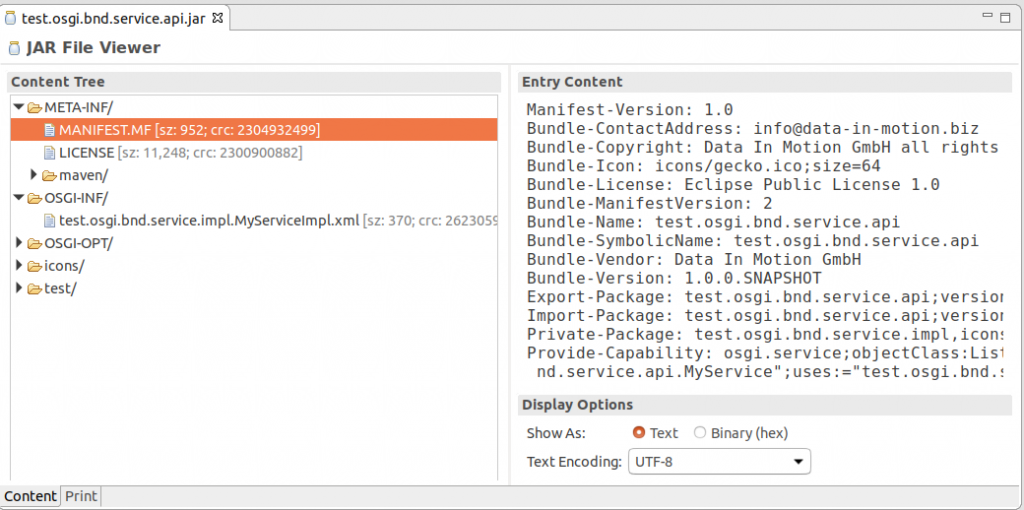
Here you can see the .jar that is generated for the API package, once I substituted the example codes with MyService and MyServiceImpl that we defined in the previous example. As you can see the, MANIFEST.MF file is automatically filled with all the required information, and also the .xml schema for the component is generated, saving us quite a lot of time!
Using another Gecko Template, the one called Component Development, we can generate a second project, with just a component (without the interface), to be our consumer.
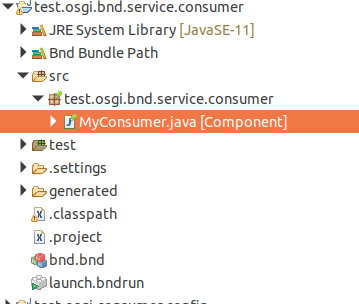
The project should like the one in the screenshot, where I already renamed the sample code which is generated into MyConsumer. Here you have an additional .bndrun file, which is something similar to the run configuration we had to build before.
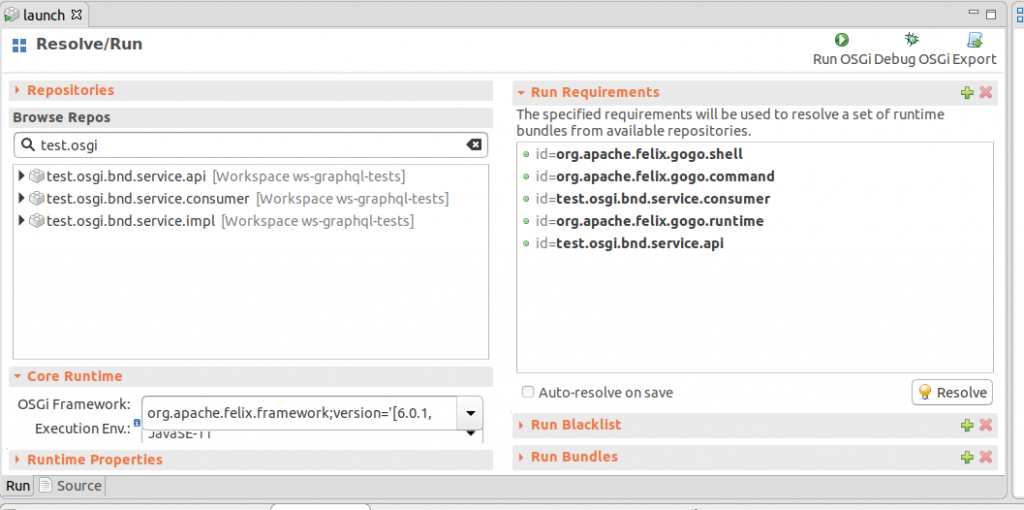
Here you just need to select the OSGi framework and the execution environment with which to run your application, and to add the required dependencies. Then press the Resolve button. This automatically checks the consistency among the dependencies and warn you if missing or cyclic dependencies are found.

And then you can press Run and you should get the same result as in our previous example, but with a lot less effort!
From now on we are going to use bnd for all our use case with OSGi. However, we thought it was relevant, at least for this simple case, to show the different steps also in plain OSGi, even if, as I told you, there is no point in doing that now since there are such convenient tools like bnd. But at least you get the feeling of a few steps that are happening under the hood, which is always good!
Our next tutorial will be a slightly more sophisticated version of what we have seen today. In particular we will talk about configuring our services and use them based on certain configuration properties!
by Ilenia Salvadori